One question, I get asked quite often in the last years, is how to change the name (and therefore URL) of an Enterprise Vault Server.
Especially, when the installation is a few years old, it was best practices, not to use a full qualified server name as server alias in Enterprise Vault, but just a hostname. And even, if the FQDN was entered, quite often a .local name was used.
Nowadays, many companies wish to be able to access the archived elements not only from their internal networks, but also via the internet, when working abroad (or from home office during Corona times).
Unfortunately, the server name entered during the setup of the environment is used during the creation of the shortcuts for the users’ mailboxes. So all the shortcuts contain the servername in the URL to the archived element.
Here’s an example of a shortcut to an archived e-mail:
http://kvsserver.domain.local/EnterpriseVault/ViewMessage.asp?VaultId=11E40A1AC903819439AB4B13A08xxxxx10000archiv&SavesetId=201604231449072~201504230xxxxx~Z~E1003734740BD8C3E954A31DFxxxxx
So, what to do in order to provide access to these URLs from outside?
Here’s the process:
Introduction
It’s a four step process that takes qute some time. Depending on the size of the environment, the number of shortcuts in mailboxes etc. it can take multiple days to complete:
- Create the required DNS records.
- Create the reuired firewall policies.
- Change the server name in the SQL database
- Modify the shortcuts with the updated information
Presumptions
| Current server name: | srv-ev01.domain.local |
| Current server alias | kvsserver.domain.local |
| New server alias | archive.domain.com |
| Public IP used for the EV server when accessing from the internet | 1.2.3.4 |
Step 1 (DNS records):
The new server alias name we will use in the shortcuts must be resolveable from internal clients, as well as from clients outside the companies network. In most cases, this requires a split-DNS configuration, meaning that the same name is resolved to an (interal) IP address from the company’s internal DNS servers and to a different (public) IP address from DNS servers in the internet.
In our scenario, we need an alias (CNAME) record on the internal DNS that resolvesarchive.domain.com
to srv-ev01.domain.local.
In addition, we need a host (A) record on the public DNS that resolvesarchive.domain.com
to1.2.3.4
Step 2 (Firewall):
All clients (internal and external) need to be able to connect to the EV server using HTTPS (443/TCP).
Step 3 (Change Server Name in SQL):
Before modifying the database, please doublecheck that you have a valid backup of the database.
Use the following script to check the current entries for the server name and alias:
USE EnterpriseVaultDirectory
SELECT ComputerName as "Alias", ComputerNameAlternate as "Physical Name"
FROM ComputerEntry
Use the folowing script to update the entries to the new values:
Use EnterpriseVaultDirectoryUpdate ComputerEntrySET ComputerName = '<New alias for EVSERVER>'WHERE ComputerName = '<Old alias for EVSERVER>'
In our scenario:
Use EnterpriseVaultDirectoryUpdate ComputerEntrySET ComputerName = 'archive.domain.com'WHERE ComputerName = 'kvsserver.domain.local'
Afterwards you’ll need to follow these steps:
- Restart the
Enterprise Vault Admin Serviceon the EV server. - In the EV console, right-click on
Enterprise Vault Servers, selectUpdate Service Locationsfrom the context menu and follow the instrucions in the wizard:

- In the properties window of the archiving task(s) navigate to the tab
Synchronizationand start a synchronisation job for all mailboxes: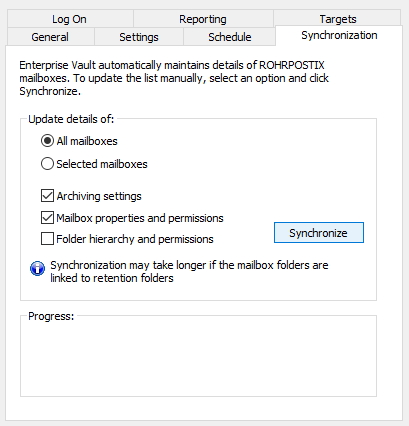
- Wait for the synchronisation to complete (this can take several hours, depending on the number of mailboxes).
Sources:
https://www.veritas.com/content/support/en_US/article.100025816
https://www.veritas.com/content/support/en_US/article.100031222
Step 4: Modifying the Shortcuts
Note: This step produces massive load on the EV server, as well as on the Exchange server(s) and the Exchange servers will create lots of log files.
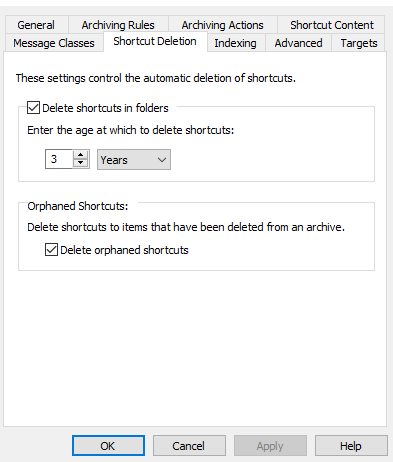
Therefore, I highly recommend not processing all mailboxes in a single step but rather process them in smaller charges and assure, the log files on the Exchange servers are purged in between by running a backup.In addition, you should discuss, whether it could be a good idea, to delete shortcuts from the mailboxes, when they reach a certain age, i.e. 3 years. If you decide to do so, you should implement this change before proceeding with modifying the shortcuts.
To change the maximum age of shortcuts, open the properties of the
Exchange Mailbox Policies, navigate toShortcut Deletionand set the desired age:
In order to modify the content of the existing shortcuts, follow these steps:
- Stop all archiving tasks on the EV server and set them to Manual.
- On the EV server, add the following registry key:
| Path: | HKLM\Software\WoW6432Node\KVS\Enterprise Vault\Agents |
| Type: | DWORD (32 Bit) |
| Name | RestoreShortcutBody |
| Value | 1 |
- Restart the
Enterprise Vault Admin Serviceon the EV server. - In the EV console make a right-click on the archiving task(s) and select
Run now...from the context menu. - Change the settings to
Shortcut ProcessingandSelect Mailboxes:

- Select the mailboxes to want to modify and start the process.
- When the process is finished and you’ve cleaned the Exchange log files as described above, verify, whether the shortcuts have been changed the way you wanted.
- If so, run the process again against the next set of mailboxes.
- After processing all mailboxes, set the registry key
RestoreShortcutBodyto0and restart theEnterprise Vault Admin Serviceon the EV server. - Set the archiving tasks to
Automatic.
Sources:
https://www.veritas.com/content/support/en_US/article.100017521